How to Focus a Camera
Getting Started With Your Camera Lens Focus Process

Max Henkart
1.) Find your Camera Focus Card or print a Test Target
First, you need a test chart to focus the lens/camera. There are numerous different test charts such as USAF test chart, Siemens Star Charts, ISO12233 slant-edge, hyperbolic wedge, etc....
The best quality objective image measurements and focus process should be completed using software and properly mounted test charts from Imatest or Image Engineering.
We know that not everyone has an Imatest or Image Engineering license, so we include several focus cards in the majority of our shipments. The 2" FocusCard 36 is a Siemens star chart with 36 square wave spoke line pairs and a contrast ratio of 80:1. This is a subjective focus tool and is not suitable for objective eSFR measurements.
We also sell these cards as at-cost to make your life a bit easier: Commonlands Focus Cards

2.) Determine the Nominal Object Distance for your Camera
Consider all of the objects you intend to capture with your vision system.
What is the closest? What is the furthest? What is the median of the object distances?
Use our Depth of Field Calculator to calculate the distance to set the targets. Enter the EFL, F#, and pixel size. Then, move the nominal focus distance slider until the near and far focus distances cover your entire range. This nominal focus distance value is the distance at which you should set your targets.
You may have a "what is sharp enough" preference that differs from this theoretical calculation, so try a few different distances based on 2px and 4px blur.

3.) Prepare Your Camera Set Up
Set 1 focusing card in each diagonal direction 50% from the center to the corners. Use the values calculated in step #2. These should be set at the closer of the Nominal Object Distance, or the Hyperfocal distance, calculated in step #3.
You can move these around, but using only a single target in the center usually does not yield optimal focus across the image.
We recommend using a neutral gray background to minimize auto-exposure clipping.
All assembly should occur in a clean environment. Any dust that lands on your sensor will create "blemishes" in the image. For quantities >=100pcs, we can assembly our lenses with our lens holders using a ~200pc/hr semi-automated machine; this reduces anodization debris that would otherwise land on the sensor during assembly.
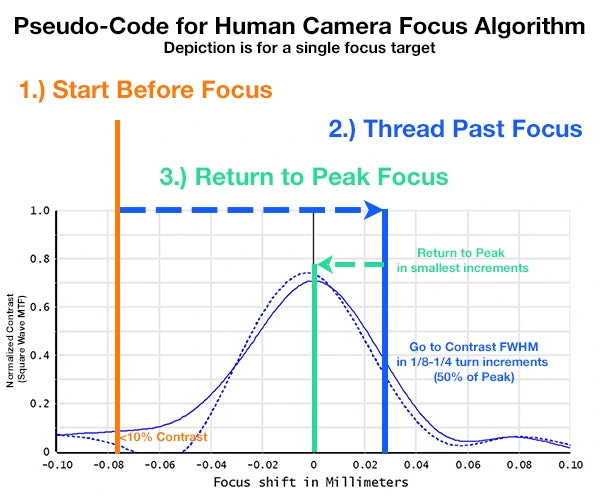
4.) Start Your Camera. Go Past Focus. Come Back.
1.) Open a real-time stream from the camera. Refer to your camera manufacturer for details.
2.) Clean your sensor, lens threads, lens mount threads, and lens rear surface using an air dust tool. Don't use an aerosol-type air dust tool; any forced air method needs to only use room air or nitrogen.
3.) Slowly thread your lens into focus.
4.) Go approximately a 1/4 to 1/2 of a turn past focus. You want to be able to clearly determine that the camera is out of focus.
5.) After the lens starts going out of focus, return to best focus using 1/16 turn increments.
This process makes sure you are at the true peak contrast.


5.) Lock Focus and Return to Console
If you are using one of our M12 lenses, set/lock the camera's focus using one of the 3 recommended methods below.
1.) Use a low-outgassing adhesive to secure focus. Best practice (used by automotive and high volume camera module manufacturers) is to use a UV+Heat dual cure adhesive. This type of adhesive allows you to set focus, then cure the adhesive through the thread shadow zones. You can also test heat-only adhesives that have a low cure temperature; this assumes you are using a metal lens holder and metal barrel lens. We suggest contacting your preferred adhesive vendor (e.g. Delo, Loctite, ThreeBond) for more specific recommendations as it is dependent on the lens holder and lens barrel materials.
2.) If you do not have adhesive or the curing equipment, you can use a focus lock ring.
3.) If you do not have adhesive or focus lock ring, you can use a couple wraps of Teflon (plumber's) tape. This can also be used in addition to adhesive and/or focus lock ring, to reduce the thread tolerance mismatch (wobble) between the lens and lens holder.
We do not recommend using a set screw in the lens mount as it will push the lens in one direction, introducing image plane tilt. This makes one/two corners or sides go be out of focus.
Let us know if you have any feedback or questions about these instructions.
What's Your Application? Our Lenses Cover the Spectrum.
Factory Machine Vision?
Our cost-effective compact C-Mount lenses are designed for up to 1.1"~1.2" format global shutter sensors.
Intelligent Everywhere?
Our low distortion lenses with multiple F# can be used to optimize your depth of field.
Surveillance?
Our fisheye and IR Corrected lenses are suitable for doorbell cameras and active IR illuminated scenes.
Does it Require Getting Dirty?
Our IP67 and IP69K lenses are suitable for applications exposed to the environment.

